If you feel you aren’t flexible, there are ways so many ways you can improve and work on this! Our bodies adapt to the way we move them, so if you want to be more flexible, it’ll take some time and dedication. But don’t worry! With these five yoga poses, you can start increasing your flexibility right away.
Downward-facing dog
If you don’t practice yoga on the reg, then chances are you’ve never heard the term “downward dog.” But if you’ve ever been to a gym or watched a workout video, you have probably seen this pose. It’s a staple of most exercise routines and is also known as adho mukha shvanasana (meaning “downward-facing dog”).
This pose stretches your hamstrings, calves and lower back muscles while strengthening your arms and shoulders. It also increases circulation throughout the body while relieving stress on the spine. Plus it looks cool!
Upward-facing dog
Upward-facing dog is the position of a yoga student’s dreams. It’s also one of the easiest to do, and it serves as a gentle warm-up before more challenging poses.
To get into upward-facing dog, lie on your stomach with your legs together and hands under your shoulders. Push up through your palms and straighten out by lifting your hips off the floor until they form a diagonal line from head to heels. Your arms should be shoulder width apart with palms facing each other (a). Bend one leg at a time so that you can raise it off of the ground (b). Your toes are pointing towards the sky, but make sure not to lock out any joints when holding this pose for long periods of time—that can cause injury!
Standing Forward Fold
Stand with your legs hip-width apart. Bend your knees slightly and lean forward, reaching for your toes. If you can’t reach them in one go, keep coming down until you feel a stretch in the backs of your legs. Be sure to keep your back straight—don’t round it! Hold this pose for about 30 seconds before slowly standing up again.
When finished with the pose, walk around and gently massage your lower back and hamstrings with both hands on each side of the body. This will help to further release any tension or tightness that may have built up while doing the exercise. You can also go into child’s pose (see below).
Dancer’s Pose
Dancers pose is a great place to start if you’re new to yoga, or if you want to try something more challenging.
To get into dancers pose:
Sit on the floor with your legs spread wide apart.
- Bring your hands on the floor under your shoulders and walk them back so that they are in line with your hips. Your arms should be parallel to one another and pointing straight towards the ceiling (this will be an L shape). This is called table top position.
- As you inhale, lift up onto all fours by bringing down one knee at a time into plank position (hands directly under shoulders). Then as you exhale lower yourself down until both hands are flat on the ground at shoulder height.*
- Holding this position while breathing slowly strengthens core muscles including hip flexors and abs while stretching hamstrings, chest muscles and back muscles.
If this stretch feels too difficult at first then don’t worry! Give it a few tries over several days before trying again because it takes practice for these poses to feel comfortable. If it still feels too difficult then ask someone else for help—there’s no shame in asking for help when learning new things!
Natarajasana, or Dancer’s Pose, is an intense stretch for your shoulders and abs and a great way to increase flexibility in your back.
You may not think of your toes when it comes to yoga, but they are a vital part of many poses. Natarajasana, or Dancer’s Pose, is an intense stretch for your shoulders and abs and a great way to increase flexibility in your back. This pose also helps strengthen the lower abdominal muscles that support the spine while improving balance through strengthening the ankles and feet.
To get started with this stretch:
- First roll up one leg at a time like you’re rolling up a yoga mat—this will give you better access to your toes as well as making it easier on both sides when trying this out!
- Then reach toward them with both hands so that all four limbs are stretched fully into the pose without breaking at any point (you should be able to hold this pose for a few seconds). If you need more room than what’s offered here then simply move away from wall until there’s enough room but still stay next to wall because otherwise it may be difficult if not impossible).
- You’ll know if there’s too much room because then simply just keep moving away until there isn’t anymore room left anywhere between yourself and wall.
- Then remember how many times per day works best for everyone individually; morning works best before breakfast followed by evening after dinner.
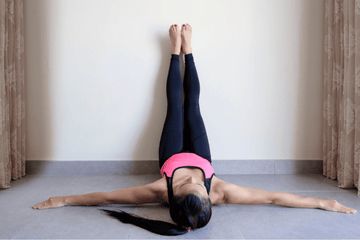
Tree Pose
Stand tall with your feet together and arms at your sides.
- Inhale, lift your right leg as high as you can. Keep it straight and attempt to plant it on the floor behind you. To modify, keep both legs on the ground.
- Exhale, bend at the waist from side-to-side while keeping both hands planted firmly on either side of the body, then return back upright by bringing your torso back to normal alignment with each breath in and out. Repeat this side-to-side motion five times before switching sides (left arm resting against left leg). Once finished with one side, switch over to repeat the same motion but with your left arm resting against right leg and vice versa until five repetitions have been completed for each side (10 total).
- Now that all repetitions are completed for one set, stand up straight once again with feet together.* Inhale deeply through nose; exhale out mouth after holding breath in for a few seconds at its fullest capacity as if making sound through whistle or horn—this will help release any tension from muscles being worked during exercise.* Repeat this three more times until feeling fully relaxed again.* Enjoy feeling refreshed!
If you’re not flexible now, it will take some time to improve. Don’t be discouraged.
If you’re not flexible now, it will take some time to improve. Don’t be discouraged. Instead, focus on the stretch and the feeling of releasing your muscles. Your body knows how to stretch; it just needs a little guidance from you. If it hurts, stop doing the pose and try again a few minutes later or at another time when you are feeling less stiff than usual. You may need to practice this several times before being able to do it comfortably or even masterfully!
Conclusion
Yoga is a great way to improve your flexibility and help you stretch out those muscles. It can also be helpful if you suffer from back pain or just want to get in touch with your body. The key is consistency, so if you want to see results, make sure you do these poses every day!
If you are looking for more in-depth guidance on how to start, get my free yoga e-books where I have pulled together my top tips and poses for anyone who is a beginner and wants more support.
For more beginner poses, or if you want a more in-depth practice and want to find out more, get in touch if you have any questions on this practice or anything else!